Wednesday, July 21, 2010

The one where my husband leaves for three weeks and I almost make out with blueberries.

OH MY GOSH, YOU GUYS!

Did you know how CHEAP produce is here compared to Hawaii?

Did you know how everything tastes DIFFERENT?

Did you know that I made tomato sauce from scratch and almost got naked with it in my kitchen?

Photobucket

Photobucket

*There'd be more pictures, but I suck at this food photography thing. And it was starting to feel porn-y.

Thursday, July 15, 2010

Road Trip

Hello Internet friends! Boy, has it been quiet around here.

Did I mention we moved to Colorado? We flew to San Diego and then drove through Arizona, Nevada and Utah. I loved every minute of it. The United States has amazing landscapes and small towns--it makes me want to head out in a Winnebago and explore!

Photobucket

Photobucket

Photobucket

Photobucket

Photobucket

Photobucket

Wednesday, May 5, 2010

I looooove taking pictures.....

....but it seriously cuts into blogging time.

Photobucket

Photobucket

Photobucket

Photobucket

Photobucket

Photobucket

Photobucket

Friday, April 2, 2010

well, there goes the "candy-free" holiday

I had forgotten about the neighborhood Easter egg hunts when I declared this Easter candy-free (and don't think Blake hasn't huffed and puffed about it being that way too)

Exhibit A: Colin's chocolate-stuffed face.

Photobucket

Exhibit B: Kate's loot.

Photobucket

Exhibit C: Blake trying to figure out which candies he can nab without Kate noticing.

Photobucket

In unrelated news, Kate got this tiny little pink mixer and if it really mixed things I think I would steal it away. She put on a cooking show for us tonight and my head just about exploded with awesome.

Photobucket

*side note: We leave Hawaii in 67 days. That's not a lot of days.

Tuesday, March 23, 2010

link-o-rama

Photobucket

*image via the purl bee

*I've decided this Easter is going to be candy-free. My kids aren't super interested in the crappy Easter candy anyway. I'm going to make these jelly bean bags during new episodes of "Lost". And since I'm buying all this felt, I might as well squeeze these in too.

*I've been reading this book, and found these "happy tickets" as a reward system. Works like a charm and seriously, how cute are they?

Photobucket

*image via ambrosiagirl

*Did you watch Jamie Oliver's Food Revolution? I might have watched it, gone shopping and now have an entire fridge of green things. Bok choy, anyone? Find more of his recipes here.

*Kate's favorite toy yesterday? An egg. The day before that? A red pepper. I really just think she is the funniest little thing ever.

Photobucket

*I took pictures of a friend's baby last weekend. I don't want another baby.....but I really wish she would have thrown up on me just to seal the deal. And not smelled quite as good.

Photobucket

*passed out in between poses.

Friday, February 26, 2010

Photo Friday: Positive/Negative Space

Today's Photo Friday can be done no matter what type of camera you have! We're talking about positive and negative space.

Negative space is defined as "the space around the subject of an image." and positive space is your actual subject. If you're more visual, in the photo below the black area is negative space and the baby is the positive space . Areas of a picture that contain "nothing" are important visual elements that provide balance in an image.

Photobucket

Why do we care about this? Sometimes I think we are so caught up in just TRYING TO GET THE PICTURE that we forget about the space around our subject. Especially with children, I think having negative space around them makes them look little (and helps us focus on their faces instead of our unfolded laundry in the background) Don't forget to look up or down to find some clean spaces--sometimes the sky or even your carpets work great!

Used correctly, your negative space should compliment not compete with your subject.

Settings note: Having your camera set to a lower aperture also helps to blur out your background and really make your subject stand out as that positive space.

The Image Is Found are photographers who ROCK at positive/negative space. This session for example.

A couple examples:

Photobucket

Photobucket

Photobucket

Go out and try it!

{this is where I would write something about making negative space a positive experience, but I won't. That would be cheesy}

Wednesday, February 24, 2010

Kate: Two Ways

Silent.

Photobucket

LOUD!

Photobucket

Those seem to be the only two settings she came with.

Saturday, February 13, 2010

Photo Friday: Adding Contrast In Photoshop

Hey! I guess I don't do regular updates on this blog anymore. Photo Fridays are just so much more fun.

I had a questions about which type of editing software to use (Picasa vs. Photoshop Elements vs. Photoshop Premier?) I personally have Photoshop CS3. It took me a long time to figure out how to use it and still I think I only use about 10-15% of it. I think Photoshop Elements is a great place to start with basic editing to your pictures.

That being said, I was recently at a friends house and got to play around with her Lightroom program. IT IS SO EASY! I would say if you want to quickly be able to edit your pictures without learning a bunch of Photoshop talk, give Lightroom a try. You can even download a trial at the Adobe website.

Today I'm going to show you how to add contrast to your pictures in Photoshop.

In Photoshop go to Image --> Adjustments --> Curves

Photobucket

Once in there, you'll see a box like this ...

Photobucket

See the way the line curves? That's called an S-Curve. To get that, click on the line right in the middle. Photoshop will put a dot where you click. After the first click, click again to the left of that one (there is a dot where I put mine) and pull it 'til the line makes an "S." You'll see the photo changing as you do this and after a little playing with it, you'll be a contrast adding pro.

Here's the thing. I use my contrast very sparingly on color pictures. I don't think I would have added quite this much contrast if I wasn't showing it as an example.

Black and white pictures is where I really think contrast shines. I love deep, dark black tones and bright whites. So here's what I do--I convert my pictures to black and white first, using Images --> Adjustments --> Black and White.

Photobucket

I know! This kind of a flat, blah black and white. Use the same method I explained above to add contrast to your black and whites. Again, for this picture just a small amount of contrast works.

Photobucket

See? Much better, right?

Photobucket

Let me know if you have any questions. I'd also love to hear anyone's experience about various editing programs!

Friday, February 5, 2010

Photo Friday: ISO

Warning: Photo Fridays are random. If you have a question and would like me to answer, leave it in the comments or email me. The email button is over there! ---------->

Links to more camera subjects at the bottom of this post.


Today I'm talking about ISO.

The acronym ISO refers to the International Standards Organization. But we really don't care about that. In basic terms, ISO is a way to adjust how sensitive your camera is to light.

Check out your camera's manual and see how to change your ISO setting. You'll see a few options. 100 is the lowest ISO for most digital cameras and 800 is the highest for most non-pro DSLRs.

If you set your camera on the lowest ISO (100) you are telling your camera that you have lots of light to work with. This is a great setting for a sunny day, shooting outdoors. If you don't have quite that much light (for example if you're outdoors, but it's cloudy) you should bump your ISO up a little, to the next setting (200). Heading indoors? Better go up to 400. You might even need to go all the way up to 800or 1600 if your camera will let you, depending on how much indoor lighting you have. By setting the camera on a higher number, you're telling the camera "Hey, I don't have much light to work with here, so I need to you to be really sensitive to what light there is!"

Are you thinking "Why do I need to worry about ISO when I have my flash? Flash brightens everything!" Because flash sucks.

Most people have cameras with flashes that pop up whenever there isn't enough light to shoot with. Direct, on-camera flash is the worst thing you can do to your photos. It's harsh, it's unnatural looking and doesn't it totally make whoever you're photographing blind? Stop using it. Instead of popping the flash up, change your ISO. Your results will be better, I promise.

One downside about shooting at high ISOs is the "noise". The higher ISO you use, the grainier (or noisier) your photos will be. Here's an example of a photo shot at different ISOs. See how the grain (noise) increases as you take your ISO higher?

Photobucket

For me, the trade-off is totally worth it. I'd rather have my image a little grainier than use that blasted flash.

Here's a recent example. While at the Experience Music Project, my family was recording a fake CD. It was really dark, but the light in the sound booth was this awesome pink color. If I had used my flash, it would have blinded Colin and blown out the existing light. Flash=suck.

Photobucket

So I bumped up my ISO to 6400 and shot! Sure, it's a little grainier than usual but to me it's a great trade-off.

Get out your cameras and play with your ISO. Feel free to link to some of the pictures you took!

Learn more about aperture here and shutter speed here.

Friday, January 29, 2010

Photo Friday: Lenses

At Bad Girls Weekend I was asked several questions about photography. I took several notes of questions some of the woman had and hopefully will start doing Photo Friday again to answer them.

Fingers crossed.

Today: Lenses

People email me all the time about camera recommendations. I usually tell new-er photographers to grab a Canon Rebel XTi but stress that your lenses are really a more important part of your camera. Most of the time the lenses that come as part of a camera kit are crap--I recommend buying the camera body by itself and then adding lenses.

So how do you pick a good lens? First, you have to think of what you'll be shooting. Do you want to shoot your kids playing outside on the playground? A newborn snuggled up? A flower garden begging for a close-up? Once you know what you want to shoot, it's easy to pick a lens based on focal length (how much you can zoom in) and aperture (how blurry you want the background to be) Don't zone out on me--I'll explain!

Focal Length

Every lens has a focal length. That is how close or far away from your subject you can shoot. Grab your camera and look at the lens - on the front where the glass is, there are some numbers and the letters mm.

If your lens has two numbers, like 18-55mm, that means it's a "zoom" lens. With a zoom lens, you can shoot things close to you and farther away. Many beginning lenses--especially if you got it with a kit--are zooms.

If it has just one number, like 50mm, that's called a "prime" lens. I love to shoot with prime lenses, mostly because they make me move around and I get new and different angles than if I shoot with a zoom. You can't zoom in and out, but that's what your feet are for!

Aperture

Aperture is one of those things that scares people! It sounds confusing but it's really not that tough to figure out. Trust me, if I can do it--you can do it!

Apertures are the same thing as F-Stops, so if you see an F before a number (like F8), we're talking about your aperture. The simplest way to explain apertures is this: the smaller the aperture number, the blurrier your background will be. The bigger the aperture number, the more in focus everything will be.

Think about what you want to shoot. Do you want a photo of your baby's toes, up close with the background blurry? Set your aperture on it's lowest number and zoom in close. Are you trying to take a photo of all the kids and the dog in front of your house? Set the aperture on a higher number to keep it all in focus.

An exercise: Change the dial on your camera to A or AV mode and change the aperture to the lowest number it will let you (check out your camera manual on how to do this) Shoot something still and see how it looks. Now change your aperture to a bigger number and shoot a few more. See how everything looks more in focus? Play with it and you'll start to understand it better!

A fantastic lens is the Canon 50mm (focal length) 1.8 (aperture) which is around 100 dollars! Nikon makes a 50mm too!

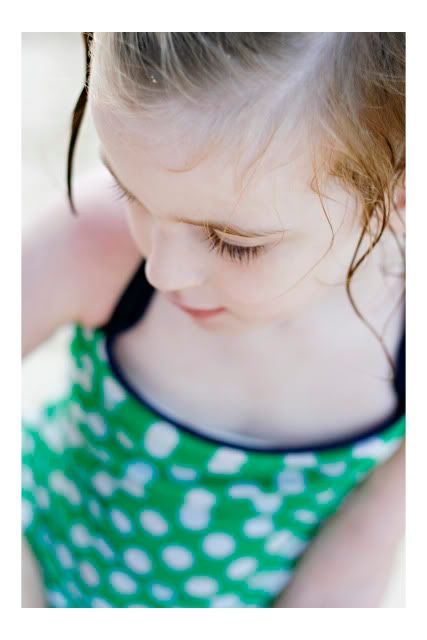
I use my 50mm 1.8 all the time! See in the picture of Kate below--just part of the picture is in focus? That's the 1.8 aperture. If I would have had it at a higher aperture (like 4 or 6) more of her body and background would be in focus.

Photobucket

Does that help at all? If you have any other lens questions, I'll answer them in the comments!

iPhone Pictures

Photobucket

Photobucket

Photobucket

Photobucket

Photobucket

Photobucket

*all pictures using ShakeItPhoto for the iPhone.

Vacation Pictures: North Carolina

After Seattle, Jen I went to Bad Girls Weekend. That alone deserves it's own post (coming soon) It was (as has been recounted on MANY other blogs) AMAZING!

Photobucket

Photobucket

And, oh the babies! So many chubby, gurgling six-month old babies. I might have gone a little baby crazy if I hadn't been puked on several times. Instant birth control.

Photobucket

We visited a house there called WhaleHead Club. Some crazy duck-shooting woman and her husband lived here. Together they were rich and shot and skinned ducks. Somehow I think the tour guide there wanted us to get more out of it. We did sneak off into several dark spots during the tour--which just ended up being basements.

Photobucket

More coming soon!

LinkWithin

Related Posts Widget for Blogs by LinkWithin